Is it even possible that one thinks about a workshop without having a woodworking bench? Ask any woodworker what’s the most important tool they use every day. I’m sure most of them will name a woodworking bench.
This tool needs to be tough and sturdy so that your workshop seems well equipped. You will be hammering stuff over it, clamping when necessary and sometimes do layouts or assembling.
No Matter what type of usage you can remember of right now, one thing is certain, it’s damn important. And absolutely no woodworker should be having a vacant space without any bench.
A great option is making one yourself. Today, I’ll tell you an easy process on how to build a woodworking bench.
Everything About How to Build A Solid Workbench:
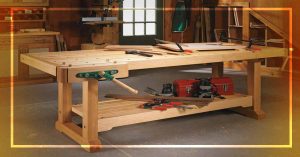
A Great Workbench
It’s not just a wooden work bench, this stuff is literally the main work-holding system of your workshop. Remember that!
You can’t expect a minimal table to be a part of your complicated project inclusion. This will only ruin things. So, it’s really important to understand what a decent woodworking workbench looks like. That way you’ll be able to make something useful by the end.
So, what is the perfect workbench qualities?
Well, this is the set-up place where you keep all your essential tools while working. There need to be proper bench dogs and planning stops. Also, it needs to make available board jacks and holdfasts. To get better usability, the bench should also include an extra integrated structure as another workbench.
One more important point that you can absolutely not neglect is sturdiness. Your workbench needs to be tough enough. It will be used for really heavy tasks. So, make sure the weight is right and it does not move easily. This could be a huge dilemma while working on a specific project if it suddenly starts to move around.
Usually, heavy workers cannot expect a simple 2x4s workbench to carry load of heavy hammering and most of the time this gives no notice for sadden crash.
For a heavy user, conventional style workbench that comes with mortise-and-tenon connects will provide hard and rigid performance. However, if you are a bare novice, this might not be totally necessary. You can still manage with a regular one.
Get Some Tools!
Just save time and stress by getting a few stuff earlier the DIY process. These are basically
- A wrench that is adjustable.
- Saw, a circular one is preferable.
- Clamps
- Jigsaw
- Tape measurement
- Hammer
- Glue
- Corded Drill
- Table Saw
- 2x4s
- Carriage bolts
- Lag screws
- 3-in. deck screws
- Washers
- Nuts
Step 1: Making the Base:
- The first one in woodworking workbench plans is making base by using four 2x4s. These need to be 33 inches. Also, grab four 2x4s with 46 inches measurement for the long stretchers. You are going to use 16.5 inches 2x4s for the end stretchers. You need four here as well. Also, use five-foot 2x4s for the benchtop. Use fifteen of them.
- Now start by clamping the legs and stretchers. You can use a drill to base them together. Use some bolts for extra secureness.
- There should be around 16.5 inches width going around from one outer edge to another for the legs.
- You need to assemble the top of workbench, simply use a large sawhorse strategy here.
Step 2: Top Assemble
- Ask anyone about how to build a solid workbench and they’ll say to make the top rigid.
- To make the workbench top you need 2x4s as I said before. You need to start with cutting fifteen top boards. The length should be exactly five ft.
- Now simply use similar width to rip them using a table saw. This tool will help to make sure the top glues well without any round edge disturbing. It should fix flatly.
- Now use two of the top boards. You need to cut them into three pieces, this is for the leg slot. The middle piece should be 39 inches and other two end pieces of 7 inches.
- Now use glue and screw to fix top together. Use one board at a time. Deck screws with 3-inch measurement are the best choice for this.
- Make sure to keep any ripped edge facing up. You should level up any kind of adjoining boards.
- There should be enough oomph to drive every screw beneath the surface. That can be done with a corded drill.
- Each of the leg slot is inserted from every end. This is where the third glue-up happens.
- Use three top pieces and a jigsaw to create a tool tray above. This nifty thing can be a great addition for regular work later.
- Before you insert any deck-screw make sure to clamp properly. You should be careful with splitting problems. Simply use some predrill holes to get needs done properly.
- You can use a scrap piece of 2x4 as a spacer. This is great for screwing on the long leg slots.
Step 3: Final assembly
- Now, this is the final part of how to build a workbench. You need to create some play around leg posts. You can simply loosen up screw bolts one lower stretcher. Do this before joining the top to base.
- You need to make sure the leg posts and tap of top are all in level with perfect alignment. Use a hammer and scrap wood piece to do so.
- Make sure to work around the table with enough time on hand. Every leg post and tabletop should be in level.
- Now carefully secure the lower stretchers.
- You are done!
Safety Precautions
Wear proper safety gloves and goggles before getting into the process.
Use a noise-free area to perform the project.
Don’t go for cheap quality pieces for the making.
Always be extra careful while cutting, don’t apply to much force or rush things.
If you are a novice, have someone experienced with you.
When Should You Think About Buying One!
I believe, the one who is into woodworking business for a while now will already own a quality working bench. They may need a DIY version for extra or spare needs. However, if you are a novice then probably also, a DIY woodworking bench will do enough.
However, once you have to perform heavy and daunt task, it’s risky to trust on a DIY version. You should think about spending on a professional bench if you are serious about it.
Yes, a self-made one is good and saves money. But someday it is confirmed to get broken. These can’t be really rigid for a high number of heavy tasks. That’s why professional and expert woodworkers who are working for years will always spend a good amount of money to get their bench right.
You see, this is the basic tool of your entire craft. If it does not serve right you won’t be able to either. So, know well when you are ready to move one step ahead. Let your creativity have the proper base to start with.
Verdict:
Looks like I have come to the end of today’s discussion. I hope now, you have a good idea about how to build a woodworking bench. This may not be the best-looking DIY version out there, but I tried to keep it strong.
You can customize the bench with your own ideas. Creativity has no boundaries and the same goes for this process as well. Just make sure to get the measurement ratios right.
Also, you can ask someone in your neighbor or friend group who is quite experienced with woodworking to help you out. Woodworkers love to help each other, I’m sure they’ll too! Have a Nice Day!