Drawer slides are actually a very basic thing that needs minimal tools for installing. This simple DIY is easy to do and anybody can try it.
Of course, there are certain points you need to be careful about. Otherwise, the slides won’t glide drawer properly. And to make you aware of those points, I’ll be talking about how to install side mount drawer slides today. Let’s dive deep into it!
How to Install Soft-Close Drawer Slides: Step-By-Step Tutorial.
There are so many types of drawer slides available. You can purchase the one suitable for your usage. However, my favorite ones will always be soft-close types. Many people love the full extension ball bearing slides as well.
No matter what type, make sure to choose something that diminishes the stress of a dipping out drawer.
Also, it needs to be simple enough to install because you might just have to fix them occasionally. Follow along with steps below and you’ll have your drawer sliding smoothly by the end.
1. Removing the Drawer
You’ll start emptying the entire drawer. Make sure everything is out. Then you need to remove the drawer by pulling it all way out. Simply set it aside from the cabinet.
For the maximum cases, drawer just simply comes out with pulling backward. However, if this technique fails to take it out, you’ll have to deal with latch or screws.
o all the way to the back end of drawer. You’ll notice some latch or screw here. You need to pull the drawer as much as possible.
In that position, start to unscrew slides of the drawer. You can use a good screwdriver that suits the hardware. Here, a hardware should be made with a couple of slide pieces. These are basically attached to some screws.
You need to understand what type of slide you have. Depending on this information you need to figure out the location of metal track. It should be on the sides of drawer or underneath. The remaining half part should also be in a similar location.
You’ll notice that there are one or more screws to attach slides with front and back ends. To unlock them simply press down clips. It should be somewhere on slides. You need to unscrew these.
2. Measuring the Drawer
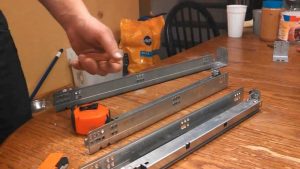
This step is about how to measure for soft-close drawer slides with tape. This is important for a secure fitting. You’ll have to figure out the old slide’s length. There are various sizes available for drawer size. What size drawer slide do I need will depend on this measurement.
For someone who does not have sides available for measurement, use a simple trick. You can simply measure the distance of your drawer’s front to back.
In most cases, the average slide size is 14 inches or 36 cm. There are some deeper cabinets available that come with longer slides.
3. Placing Slides for Drawer
Against bottom of drawer, you’ll have to align the tiny slide. Drawer should be laying on the slides side. The drawer’s bottom edge and slide should be flushing against. The end of slide that is thicker and squared should be flushed with drawer’s front side.
For under-mount slides, you’ll have to attach these beneath the drawer. You’ll have to use one for each side on left and right.
For a center-mounted drawer, you’ll have to use only one slide. This slide attaches the drawer’s bottom. It keeps running from front to back in the center.
You need a pencil next to mark the slide placement on a drawer. Right above both ends of slide, draw a thick and dark line. You should also mark down the holes for screw in drawer. Both ends would have screw holes for slide.
4. Drilling Holes for Slide
You’ll need an electric drill for the next step. Using the power tools simply create a half-inch hole inside marked spot. This is where the screws are going to fit for slide attachment.
By drilling in advance, you’ll have fewer damages when screws are added.
5. Attach the Slide to Drawer.
Let the slide get back on drawer. Align it with the mark you made earlier on drawer. Make sure the slide holes are above drilled spots.
Now use some half-inch screws for inserting. Using an electric screwdriver, quickly fasten the slide in place.
You should tighten the screws with soft hands. It should not damage the wood of drawer. Once the screw feels firmly in place, stop tightening. It should not wobble there.
Similarly, attach the other slide to drawer. The other side should be facing up when flipping drawer. Line up the drawer with slide and attach it just like previous way.
6. Placing the Elide Frame
There should be the remaining two slide pieces as well as metal brackets. You’ll have to fix the bracket one on every side. It should simply glide into the frame track. The cabinet’s screw will hold brackets end easily.
You need to test the frames once inside cabinet. This will ensure that the brackets are in right place.
Now inside the cabinet, let slide pieces sit on place. Gradually insert the bracket all way back. The bottom edge of cabinet and frame pieces should flush against side walls.
For undermount or center slide put the pieces on bottom of cabinet. To ensure the frame is aligned from front to back, set carpenter’s level. It needs to be on top of the frame. Keep on shifting the frame position until you get right level on this tool.
7. Marking & Predrilling Holes for Frames.
The spot where frames are going to rest on cabinet should be marked. Use a pencil to draw lines over both frame’s ends.
You also need to mark down the spots for rail and bracket screwing. Rails are going to have one hole on other ends. While for every bracket, there will be two screw holes.
Now using the same electric drill, you’ll need to make holes in marked positions. With similar size screws, you’ll screw down the frame pieces on right spot.
Use an electric screwdriver to simply secure the frame to cabinet. Make sure the bracket’s front end is screwed with slide as well. Avoid too much tightening for screws.
8. Insert the Drawer
It’s time to insert the drawer inside slides. Make both rails of drawers and slides come in the same alignment. The frames should be able to hold drawer’s slide.
Gradually push drawer inside maintaining the alignment. It should glide on smoothly without any obstacle.
The drawer should be able to stop inside cabinet. If this does not happen, then probably the pieces are not installed correctly yet.
Check for the slides and make sure they are even on level. You may have to do some readjustments of screws as well.
Finally, you are done with installing the slides.
Verdict
I’m near the end for today’s discussion. Hopefully you are in a better place with lots of information on installing soft-close drawer slides.
This was a simple but detailed tutorial that involves lots of screwing, alignment and readjustments. It’s about investing a generous amount of effort and time. So, you need enough patience while performing the installation. Eventually, the DIYing will work and you’ll enjoy the results of beautifully gliding drawers.