 I love trying challenging stuff with woodworking and most of you who are reading this writing today probably feel the same. Because creating a wooden bowl without using any lathe at all is not something woodworkers or any DIYer would want to do often.
But here we are for some reason trying to figure out a way on how to make a wooden bowl without a lathe. It’s probably best to use a wood lathe for this process. But if you don’t own one, making a bowl is still possible. Let’s talk about it today.
How to Make a Wooden Bowl Without a Lathe: Entire Process from Start to Finish…
Making a bowl without lathe will need a few hours of struggle. But such type of challenges once in a while can really bloom your woodworking abilities in the long run. So, if you are a beginner who’s learning such interesting tutorials or simply want a way out of a sudden crisis, try walking through this guide. It’s going to be helpful hopefully…
Step 1 – Pattern Preparation & Guideline Drawing.
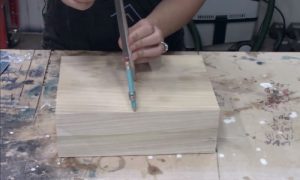 Start with drawing some lines n bowl bank. This needs to be in the very middle of bowl blank and make around two intersecting lines. The lines will basically play as your guide. So, that proper alignment of the ring is possible for later steps. This is important to make the gluing of bowl work better.
Now focus on the blank’s top part, mark it. After aligning the pattern, you need to apply some repositionable adhesive. Take an awl tool for punching, you need to find the middle point of pattern and puncture it.
Now go to the wood’s two line’s intersection. Your awl’s point should place here. The pattern and wood’s guidelines should line up. Finally, press down the pattern in that spot gently.
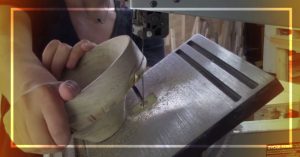
Step 2 – Making a Cut with The Outline.
I usually use a scroll saw for this step. Simply start by tilting the scroll saw’s table. It should be almost 28 degrees on the left side down. For this tutorial, I used the #9 blade.
Make sure it is tight in tensioning and then simply cut clockwise with an outmost line. You need to keep the angle right. Also, there should be no distortion at all. For this, you need to let the blade cut freely.
Get the bowl out of waste. Find the bowl’s top part on outer face of blank. Simply mark it down. So that when you glue the rings, all of them will stay oriented nicely. To the outer face of blank, you simply need to extend each guideline.
Step 3 – Entry Hole Drilling.
Now for the entry hole drilling part, you’ll need some sort of rotary tool. The hand drill is also fine if you want to go ahead with it.
There should be no problems with bit slipping. And so, I find it pretty useful to mark down all entry hole using an awl. You can try doing that as well.
You’ll also need a 28-degree angle guide for this step. Simply place it while facing the blank’s center part. Using #54 or 2mm bit, drill all entry holes one by one.
Step 4 – Ring Assembly Is Next.
To start with first ring, you need to find the outermost hole. Simply insert the blade through it. It needs to cut making a clockwise motion. Make sure cut is along the pattern line. Now find the bowl blank’s remainder top. This is where you need to place the ring.
You need to transfer the guidelines at this point. It should move to the cut ring’s inside face. Let guidelines outspread all way to inner and outer edge from the ring’s top part.
Now for the second, third and fourth ring you need to figure out next entry hole. Simply insert blade here the same way you did for first ring. Extend every guideline by marking the top. Do the same thing for third and fourth rings.
Each and every ring should be lining up properly with the previous one. You need to stack rings at this point. Also, make sure tops are oriented in the meanwhile. The guideline’s extensions should be matching as well.
On both inside and outside surfaces, you need to extend marks on rings. So that the realignment of rings is done properly.
Step 5 – Gluing Down the Rings.
You should erase down every guideline of the ring’s top face. This is to make sure there is no tiny spot visible on the bowl’s side. You are ready to stack rings and hold bowl up to the light. There should not be any spaces between rings.
If you find any, then simply sand it down. The inside face should be smooth enough showing no spaces at all. It’s time to set the base aside. For this, you need to stack rings and do a final check on whether the alignment is right.
Now start with the tiniest ring. Use a dot amount of glue on ring’s top part. Spread it evenly making the surface cover with glue thoroughly. Simply hold the next ring firmly into place. You should have a check over alignment and adjust if it is necessary. For the remaining rings, you should repeat the step.
Move to bowl press and place the glued rings over it. You should use some wax paper for rings above and below portions. Using alternating manner, keep tightening the wing nuts at this point. Imagine doing it like a car wheel.
Do apply firm exertion. But don’t go for excessive force. Let the whole thing dry for a few minutes and then you can unclamp it. Make sure you clean any remaining glue. Clamp again and let it dry gradually and completely.
Step 6 – Bowl Interior Sanding.
You’ll need a spindle sander for this step. Use the tool at a 28-degree angle setting with table. You should make sure bowl is making a contact with the spindle at this exact angle. An inflatable ball will also do great for this step. Also, you can try using a flexible pad sander.
The bottom ring interior needs to be round enough. There should be no connection with base following the attaching process. Make sure the smallest ring’s bottom is at least 6mm wide. This will help to glue it better on base.
You should sand down the base’s top part smoothly. Using bowl press just glue down it with the bottom ring. Give it a few minutes to sit well. You can remove it from the press after five minutes of waiting. Clean away any excess amount of glue from the internal bottom surface. Make sure to clean thoroughly. Come back to press and let it dry now.
Step 7 – Finishing Up the Bowl.
You’ll need the flexible pad sander or a vertical belt sanding tool for getting rid of any unevenness. You can try using progressively fine grits. This will smooth down bowl better. If there’s any sanding still required in the inner surface, don’t forget to do that.
You should focus on keeping the top rim’s width even. The top ring and base edges should be rounded off nicely. You can use some mineral spirits on the bowl. This will disclose any glue spots on it.
Simply mark those down using a white pencil or chalk. After the bowl is completely dry, use a sander to make those spots vanish away.
An Optional Step That’s So Much Worth the Final Look…
Have you heard about the Shou Sugi Ban technique? This is a Japanese method to keep the wood exterior well protected from any sort of deterioration or UV ray damages. It also keeps pests away. This is basically burning the wood part.
You can easily grab a torch kit and propane tank from any hardware store for this method. Use these and burn the bowl external wooden part. You need to get rid of loose char bits after the burning session. Then simply go for a smooth gloss-like finish using a sanding system. A 240-grit wheel brush can help you get rid of char evenly by creating a great texture.
To increase the bowl’s internal part’s contrast using a dye is a great thing to do. This way you can match the blackened exterior to create a balanced look. Choose a bright dye such as orange. You can thin down the dye using water so that there is no thick application.
After applying the dye, let it dry completely. You can follow the dyeing with a couple of wax coats. I tried one that was basically a beeswax and orange oil blend. It went really well to add some extra sheen as well as provide the right amount of protection. Plus, the smell was out of this world…
Verdict
And that was my simple guide on how to make a wooden bowl without a lathe. Such an experiment will make you learn about a lot of things. Usually making a simple bowl is not that hard without using a lathe.
Though, for some complicated projects, it could be pretty challenging. And so, for regular projects, you should think about using a lathe or buy one if not already owning. However, for fun, the experiment is a fantastic thing to try. Go for It!