 Probably you are so done with those visible hinges ruining the whole look of your kitchen cabinet. And so, you’ve finally taken the step of seeking a perfect solution. Well, if you don’t know yet about overlay hinges, this is the very right time to do that.
And we are just going to get there today with a complete guide on how to install overlay cabinet hinges.
How to Install Overlay Cabinet Hinges in 6 Simple Steps.
The solution is learning how to install self-closing overlay cabinet hinges or regular ones. Also, this involves doing it for your space all by yourself. It’s super easy and the tutorial will guide you towards with very simple instructions. So, Keep on Reading!
A Little About Overlay Hinges.
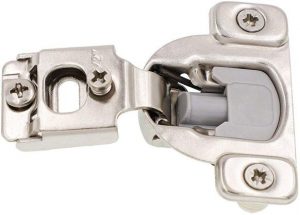 Basically, overlay hinges are supposed to be hidden inside the cabinet and there’s no sign of its existence. These could be multiple types. You can get the half overlay hinges in case of a cabinet edge with an adjacent door to share. If whole cabinet is covered with door entirely, full overlay hinges are the way to go for.
These are also available with various other features. There are cheapest ones, close hinge types and also Blum hinges with a toolless clip mechanism.
Grab Some Tools for Installation.
- Jig
- Clamp
- Marker or Pencil
- Measurement Tape
- Safety Goggles
- Drill or Driver
- Ear Protection
- Hinges
- Door Pulls
- Door
Drilling.
Use a drill and jig to make mortise for the hinge. This is to recess onto the door. You can use it for both plywood slab doors and typical shaker ones. Raised panel doors are also okay with this process. Make hinge center typically three inches away from both the top and bottom of door.
Now you need to drill the pilot holes. Double-check since the screw hole placement is going to be same for all hinges. You should use two hinges for 11-pound weighing 40 inches lengthy door. Anything longer than that will require a third hinge. If its height is over 60 inches, use four hinges. The hinge location should have even spaces to drill correctly.
Go for a Template.
Using the door, make a narrow version on a ¾” thick wood scrap piece. This should be similar to the short door height. Using the same top-bottom distance, place mortises drilling. You can slide it for the lower hinge in case it turns out too short.
Time for Finishes.
If you are considering applying a finish, then this is the right time to do so. It helps to touch up any leftover drill bit or tear out this way. You should go for paints that are specifically meant for cabinet applications. The ones with enamel in it will work best to give a durable, strong and good finish. Latex paints can be comparatively too soft and less durable.
Hinge Bases Installation.
Use the included ¾ inches screw to nicely attach hinges using square and template. You can use rubber dots on template edges that will be placed on side and top/bottom of the cabinet. Now properly align the door using template. There should be around 1/8” inches of a gap for adjacent door and trims. Usually, the sides overhanging is flushing. In case the door has more than two hinges, you should attach only top and bottom ones. The remaining ones will be installed later after the door is attached.
Some hinges come with a back screw that allows loosening for removing itself and also the door. In a clip-on hinge, you can simply pull up on its tab. This usually stays on back and releases the door as well.
From other hinges, you can remove basses and attach them to the ones in template. Using a similar method, use the bases to put on another door easily.
Eliminate the hinges from template and transfer it to door. It should be square with the door edge. Use included ¾ inches screws to install. Simply slide these hinges onto cabinet installed bases. Make required adjustments.
Final Touch with Door Hardware.
Use a jig to install pull and knobs in the door. There should be built rulers in jig and spacings to adjust depth and place handle right.
And That’s It!
Also Read: Best Drawer Slides Reviews (Soft Close & Side Mount)
Conclusion
See, how to install overlay cabinet hinges is pretty easy and straightforward. You can also try watching a few videos to get a better idea about the whole concept. The end result is surely going to amaze you in a good way. I mean, who would mind those hinges not ruining the cabinets look and color anymore.
Also, be careful about the door material. Usually, plywood is considered as the best choice for cabinet carcasses. It’s super solid and durable to any wear or tears. Materials such as Particleboard and fiberboard might be a bit poor at handling hinges. So, you should be aware of these facts as well.
Good Luck!