 Let’s time travel to a few years ago. Recall the very first day when you get your new deck built. The fresh-cut woods and its nice color glowing your entire afternoon in summer is something anybody would admire. You were so proud of it since the neighborhood was lacking another masterpiece like this.
Come back to the present. The deck looks lifeless and grey. You don’t even look at it twice since the color that once glammed your entire space, now barely exists. Also, the faded wood is looking all gloomy with some mildew growing to make it even worse.
Well, don’t be upset, you can sort out the relationship with your loved deck. Make some time on a cool day with the mild breeze going around. Let’s tune into a complete renovation for old deck.
All you’ll need is some basic tools and a heart to learn the best treatment for old wood deck. Hopefully, by the end, this wood deck restoration will get back the lost glow.
You may love to read: Best Deck Sealer And Stain Reviews| Top 10 Picks!
Restoring a Deck: From Repairing to New Railing!
With more years of usage comes additional steps for the deck recovery. You want to include every step I’m about to discuss for your deck recovery project. Especially if it’s there for five to more years.
Repairing the Poor Soul.
Before you make improvements, it’s important to get rid of the imperfections no matter what restoration project. So, the first and foremost task is repairing following after an inspection.
Invest a good amount of time to check entire deck and pay attention to the part where it directly touches ground. These are usually parts such as stair stringers, posts, and joists.
Using a screwdriver, you can simply check the joist or post. If the screwdriver sinks inside these parts then it means there are major rotting. You must go for a renovation in this case.
The next part you need to concentrate on is where deck and house connects. Most of the time there are screws and bolts that get loosened or rusted. If the area lacks proper use of spacers and flashing then there can be moisture causing rot.
You need to tighten all fasteners that connect the house and deck. If there is bent or rusted flashing then check inside. There should not be any telltale black stains. These can lead moisture all way to your home.
Now it’s time to focus on cosmetic damages. If there is a nail popping outside, you need to tap it down. Or maybe you’ll just need to replace those with new screws. Galvanized ring-shanked nails are a great option to try when installing new boards.
Screws usually don’t pop out like nails which will resist similar events in the future. Also, have a look at the railings area and see if there’s any loose wood. So that you don’t end up catching a long splinter on hand or foot.
Using a pry bar get rid of damaged boards by pulling out. You need to raise the board straight up after removing fasteners. So that the adjacent boards are not damaged.
A Squeaky-Clean Deck = Half Recovery.
Let me start this section with some news. You can’t ignore the annual clean-up regime for your deck. If you don’t keep up with regular maintenance, it’s going to be pretty hard to recover it by using just a deck cleaner.
There are several types of deck cleaners that can help you clean your deck. Some come inside a container without applicators. You need to mix them in a bucket for application.
While there are other options that you just need to connect with a garden hose. These are designed with integral applicators.
Next, you’ll have to use a stiff-bristle brush and elbow grease. Using these two you’ll be working the entire mixture into wood.
One mistake that most people do here while working with concentrated chemicals is not wearing proper protective gear. Make sure you at least wear a good pair of eyeglasses. Also, you need to protect the nearby plants.
There are plant-friendly cleaning options available, however. But they might be adding some extra bucks for overall cost. There are some very powerful deck cleaners that literally burn leaves of plants. So, make sure you use some plastic sheets to cover nearby plants
Sometimes the situation of handling tough stains or sun-damaged wood appears in the deck recovery concept. In such moments, you need to use a pressure washer. These are really effective in removing any scrub resistant stain or sun-damaged wood fibers.
Using the brush make sure you scrub whole area gradually with soft hands. Rinse it properly and let the surface dry before jumping into staining process. Boards need to be damp enough to let the cleaning solution work well.
Thoughts about the Right Cleaning Agent?
Talking about the right cleaning agent, most deck cleaners use four key ingredients for their formulation. Each of them is effective and provides the right cleaning solution for different stain types.
| 1. Sodium hydroxide or lye is a very common element that helps to deal with finish lifting or removing. You can’t keep them for a long time though. It can eat away the wood this way. |
| 2. Sodium hypochlorite is more commonly known as chlorine bleach. These are great for mildw removal. However, don’t expect it to work well with dirt or stains. You’ll have to mix it with an ammonia-free detergent to work for stain removal. Make sure to get rid of the chemicals by proper rinsing. Otherwise, it can cause fuzzing and premature graying. |
| 3. Oxalic acid is a great agent for cedar and redwood decks. It can help you get rid of brown-blk tannins. Also, it removes the iron stains that appear frequently in such decks. The brightenig effect makes it a great choice for using after cleaning mildew from deck. |
| 4. Sodium percarbonate is a great cleaner once mixed with water. It becomes an active detergtwith oxygen-based bleach and sodium carbonate. You can use it for mildew, dirt and weathered wood troubleshooting. |
Pro Tip: Avoid the mixture of bleach with ammonia. It can turn out to be poisonous gas.
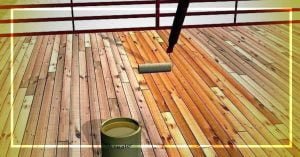
Protective Layer of Semitransparent Stain.
If you know the right method on how to sand a deck, try evening it out after cleaning. Then you can go for the protective finish application. For new woods, it’s good to try clear finishes or transparent stains. However, for an older deck, you should try a semitransparent stain.
You’ll still be able to see the grain. Using such a stain will help the old wood have pigment for a clean and uniform look. It’s going to create and extra protection layer from sun damages. Also, the semitransparent options are longer lasting than completely clear ones.
Paint usually are hard to absorb by wood. On the other hand, stains get quickly absorbed and help to form a film over surface. It does not chip or peel later.
Right Application Method:
To apply the stain, you can use a bunch of methods. Brushing, rolling and spraying are the most common ones out there. However, experts feel that using a sprayer and a couple inches brush gives better application. This is fast and lets you to apply more stain at once.
The most perfect way is spraying and then rolling or brushing. After applying a generous spray coat, use a roller or brush to evenly work the finish over wood surface. The brush is better at removing puddles.
Start from the inside corner of deck. Let it move towards outside gradually. You should also follow parallel motion to the deck boards. You can use a cardboard as a spray shield. This will protect the nearby bricks from staining.
While working on deck railings and posts, brushes provide better control. Also, you have to apply a very generous amount of stain to get an even look. This is simply because old deck wood is very parched. They need around two to three coatings to achieve a nice finish.
You should apply second coat while the first one is still wet over surface. This will help the deck to absorb stain better.
Stains are prone to wearing away instead of peeling. Especially in areas where a lot of traffic happens. So, make sure to apply a fresh coat every year.
You may also want to use a clear water repellent for each coat of staining. This will lock everything up for extra protection.
Replace Railing.
Sometimes the deck forms a very bad shape that forces you to think about a new railing. There are quite a lot of maintenance-free railing systems to choose. Using a reciprocating saw you can easily get rid of the old railings. This is not a compulsory part of deck restoration, however.
Also read: The 8 Best Drawer Slides Reviews
Verdict
There are many deck owners who have given up on their old decks already. What they don’t know is that rescuing the life back into their old deck isn’t actually an impossible project. You just need to follow the proper steps and know right tactics. And your old, lifeless deck will start to rejuvenate. Good Luck!